Thursday, 24 March 2011

Trinity saw the light of day today for the first time since November.

Well today started with me re-routing the ignition cable between the engine and the frame after seeing Steve’s bike yesterday. I had run the wiring through the right hand side hole in the frame which I now know was totally wrong.
I felt at a bit of a loss today as to what to do next. No idea why, just one of those days I suppose. So I removed the old exhaust seals ready for putting in the new ones. Next I swapped the right hand switch gear back so it now has a lug which will stop the switches spinning round when used. I still need to drill the clipon’s but I’m waiting untill I have the grips so I know where to position the hole.
Other small jobs included, removing the top yoke and loosening the stoppers so I can get a better lock to lock movement. I’d measured Steve’s lock to lock yesterday and realised mine was set far too close causing the bars to have very restricted movement.
Next I replaced the centre bolt with a slightly longer polished stainless steel one. I also fitted the lights, connected and disconnected the light wiring loom till I had it routed just right for me. Lo & behold I had no pictures of where the wiring ran so it was all trial and error.
I removed the chain tensioner bolts using an old rear wheel bolt to hold the wheel in place. I also took time out to measure the spacing’s so I can try and buy a set of gold anodized Gilles chain tensioners.  The top to bottom gap is 45mm the hole is 25mm the length is 85mm. With these measurements I should be able to find a set that will fit Trinity.


The EK Motorcycle Chain came from Kias along with the rear sproket.

I put the new chain on but now realise I cannot finish the job because I do not have a chain riveter. So I’ll try and loan one or it will stay that way till I take her to the garage for the once over before I even think about the fairings back on. Not that I have them yet.
Next I thought I’d put the headers on which I bought through ebay from Sandy Bike Spares Ltd. They fitted like a glove and took next to no time at all to bolt on.


The headers went on without any problems at all.
  
Sadly the same cannot be said for the radiator. Finding I’m two sections of pipe missing as really hacked me off. I thought everything was where I needed it to be, obviously not. I think the missing pipes may be still attached the original engine so will give the guy a call who bought it and see if he will send me them. Failing that I’ll go with a full set of Samco’s. Trouble being they do not list the L models and the P models where different. Who would have guessed those three years when the L 1, L2 & L3 where in production so few after market parts are available.


At last a picture in which you can see the gold radiator cover.

Once the radiator was on I went round and tided up the wiring up front and around the thermostat with a few cable ties.So all in all everything went along quite smoothly baring the chain & missing pipes.
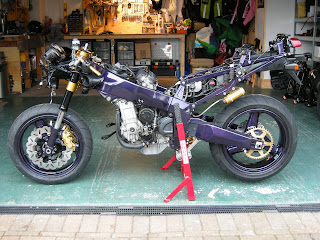
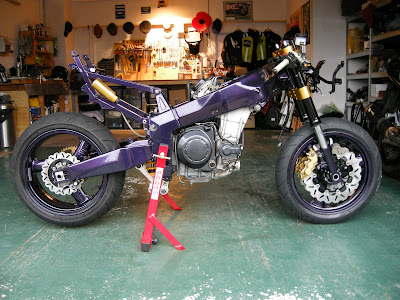
I took Trinity onto the drive to show her the light of day, first time since November last year. The pictures came out really well and I’m pleased with how things are going.


The frame looks almost black at this angle.


The shelves are starting to look very bare and one thing I did forget to mention, I opened the last envelope of bolts today when I fitted the headlights.


In fitting the Brembos masters I now have three wires to go into two
on the clutch side!

Looking at the engine now I will be putting the air-box back on once the new K&N arrives (note to self - buy one!). I still need to order the Rizoma Grips and bar ends & I’m still unsure as to if I want the Rizoma reservoirs, I'll come back to that nearer the the time.


Next thing to be fitted will be the air box.

The water overflow bottle is nice and clean now after going through the dishwasher twice. I may try this trick with the Ram Air Box before refitting it.
I dare not write a list of jobs to do, as it would go on forever and spoil my “all over the shop” approach to the rebuild.
The next big job is the fitting of the braided hoses. This is the second job I’m not 100% happy about but if the wiring loom is anything to go by I just need to take my time, have plenty of breaks, look at the Haynes & have fun.
The sense of achievement on completing each job each day is brilliant. I would defiantly recommend it to anyone who is toying with the idea. If you have the space, time & of course the money it is a fantastic feeling knowing “I did that”!

End of day picture number one!


& number two.


Tuesday, 22 March 2011

Well it’s time to take stock of where I’m up to with Trinity.

I spent 5 hours yesterday reorganising the garage to make room for the safe storage of Trinity once she is fully built. Last thing I want is her getting knocked by van doors and the like. So I unloaded all the racking system, split it up and re loaded it.
I didn’t realise just how many spare parts I have accrued from the other two bikes. So spent a little time creating a list and posting on ZX-7R Forum Redmonkey
So to summarise I got  Trinity's frame, swing arm & forks back from Kais on Monday 14th March & set about the rebuild.

From the bench......


Engine, swingarm & Yoke........


To forks, wheels, subframe & clip-ons.....


Finally the wiring loom, subframe, induction pipe work & clocks.

Not bad in a week but now I need to keep up the quality.

Other things that are going on in the background include the buying of parts, two of which I am having made as "One of Projects".
The first project to get going is the fabrication of Gold Anordized Rearsets which Mark at RCD-Tec has been working on now for a good couple of weeks. After an exchange of emails I posted the original rearsets off to Mark who used them to produce & design a set of rearsets for Trinity.  The pictures are of the right hand side, the chamfer is missing of the lever but this makes it easier for him when he is take dimensions off the computer, the spacers, excocentric adjuster and spring adjuster will be in black,


If this is anything to go by I'll be over the moon with the finished item.

I have chosen to go down the Carbon Fibre route, even though there was non around in 1993 but I just love the  look and style of it. To this end I have already bought a number of parts including Frame Protectors which I bought from German ebay but forgot to photograh.


I bought this set of secondhand Mudguard & Hugger from John,
Thank you John for taking them off your bike before selling it, your a star.


I bought these 1098 Reservoir mounting brackets from the US but got stung for import tax


Lastly the Air Induction cover which I thought was part of a pair but wasn't!


So the final part of the Carbon Fibre story starts here with the help of a US based CF Fabricator called Adam. More to follow on this in due course. Needless to say Trinity is going to look outstanding by the end of this CF Fabrication Project.

Well it's off back into the garage this afternoon to do a  little more but first there's a little matter of some Rizoma Parts to be orded.


Friday, 18 March 2011

Now that's not what I need!

Well things didn’t start to well yesterday morning, three turns of the ratchet and the bolt sheared off, “GREAT just great!”


Going from this.............


To this........... Well Chuffed!
For me, this is what rebuilding Trinity all about.

(It took 8 attempts to take this picture but got there in the end)


I had a full day to work on Trinity yesterday so starting off with a sheared bolt did not instil confidence but “onwards and upwards” as they say. 
The rough plan for the day was to fit the wiring loom and then the fairing mounting brackets which were all sat in a box wrapped in bubble wrap.  I wimped out and started with the brackets as I just didn’t really relish the thought of fitting the loom.
Now the abba stand is fitted moving Trinity round is a doddle so I got her set up in the middle of the garage. Set up the laptop on the bench with Picasa open. I’m no mechanic by any stretch of the imagination so I took loads & I mean loads of pictures, somewhere in the region of 200. The bolts I needed were all in one large envelope with “Frame mounting bolts” written on it, so I matched the Stainless Steel Allan bolts with the originals & started polishing, covering the laptop with dust in the process. What a day!


Amazing the difference 10 minutes with a polisher can make.


When it came to fitting the brackets it was just a quick look at a photo and job done. Spending ten minutes per bolt gobbled up quite a bit of time but I’m in no rush. The main thing is Trinity is put together correctly and looking as good as I can possibly get her.
Starting on the offside lower fairing bracket which is where the bolt sheared off but I’ll drill that out another day. I cracked on regardless and the day just got better. The brackets went on very easy with the aid of the pictures. No messing or guessing just look at the picture and match the bracket. Fitting the petrol pump brackets proved to be a little interesting as I was not 100% sure where they went until I put the pump back on the bracket then everything fell into place. Fitting a new fuel filter and attaching it to the bracket made the job a doddle.


Nice and clean, but for how long?


Next job on the agenda was to drop the front wheel and fit the bearing retainer clip which I had borrowed to fit in the Swing arm. Yes they are both the exact same size.
Sadly I couldn't put it off any longer and set about fitting the wiring loom.  When I looked at the pictures I then realised the battery tray needed fitting as most of the relays attach to it in some way or another. Whilst I was at it I fitted the rear mudguard but will be taking off the rear indicators as I have brand new  original Kawasaki ones to fit at a later date.


To my surprise the loom went on a dream. Again my non mechanic approach of labelling all the connectors paid off in spades. Espacially when I came to attaching the wires to the coils each connector went
1)      Top Coil top wire
2)      Top Coil bottom wire
3)      Bottom Coil top wire
4)      Bottom Coil bottom wire,   Job done!
The wiring from the ignition switch tucked in quite easily through the whole in the frame but I’m not 100% sure I have laid the cable in the right way so will get Steve to come over and I can have a look at his ZXR.


Trinity is starting to take shape again.

Being at the front of the bike I fitted the clocks, I’ve still not been able to find a replacement for the black sponge cover that runs along the top edge of the headlight, so they remain on the shelf for now. I know it’s just to seal the nose fairing a little but it's really bugging me. The side lights will also be renewed as the foam seals have dried up and split too.
As I was looking through the pictures I noticed I had laid one of the breather pipes up the wrong side of the cabs so took it off and sorted it out. Other things that jumped out from the pictures included, the wire from the coil being attached to the relay, the earth lead to the engine, the fixing of the cables to the frame & finally the earth lead to the Petrol pump bolt all prompted me to finish off a little bit more.


So all in all after a pretty crap start, the day finished on a high. Day off tomorrow, well from Trinity that is!

Tuesday, 15 March 2011

Not a bad day all in all.

Thought I'd spend a couple of hours this afternoon on the rebuild.


At least I can move her around now without stuggling.
The abba stand is great and remains attached at all times.

First job was to clean off all the dust that had settled from polishing the bolts yesterday. Then it was on with the front wheel, followed by the six pot callipers, rear wheel, brake & clutch levers, carburettors and finally the sub frame

Taking my time to carefully line up the notch on the speedo drive with the recess in the fork leg ends as I've seen a couple of split drives of late where it was not aligned correctly.

Fitting the callipers was very easy; the bush/spacer's fitted like a glove. I found sliding the calliper onto the disc at the bottom then sliding them around the disc worked perfectly and prevented any marking of the wheel rim. I used the clap bolts from the old brakes as  the six pots are M8 not M10, they fitted perfectly.


Looking a lot tidier.

Sadly the Titanium Pinch bolts are about .3mm too large around the head so will not fit in the recess. I will look into grinding them down a little but not 100% sure how to go about this as yet. So it's back to the Stainless Steel bolts for now.

The rear wheel took a little effort to fit as the slot where the bolt goes through is tight due to the powder coated surfaces. Once through the wheel sat very tidy but the adjuster bolts will have to be removed as I forgot to take them out when I had the frame coated and so they are purple!


All I can see in this picture are the weights on the wheel
(note to self, paint the weights).

Once both wheels were in the next thing I wanted to have a look at was the clutch and brake lever fitment. The bars had to be lengthened by 10mm so the wiring did not foul the brake banjos. Once attached I realised a whole will have to be drilled in the bar for the lug to fit into to prevent the electrical switches from turning round. Unfortunately the lug on the right has been broken off in the past so needs looking at. Whilst working at the front I decided to fit the bracket that the lights and nose fairing bolt to.


Starting to get a little cluttered.


From up top the yokes look great.
I love the way the reservoirs line up with the forks.

Last of all I attached the carburettors after fitting new link pipes along the bottom of the bowls. The throttle cables went on a breeze once disconnected from the throttle. Lastly I fitted the rear sub-frame so I have somewhere to tuck the Ohlins reservoir.


So far so good.


Fitting the petrol pump and the wiring loom is my next job. Once I've had a look in the Haynes and got my head round fitting the coils and piping above the engine I'll get that fitted too.

The long awaited Re-Build Begins

Ben grabbed the camera and I put on the overalls ready to make a start on Trinity's Re-Build.

First it was a good look through the Haynes, laying out all the bolts, nuts, spacers and grease. Then I draged the new engine into the middle of the garage and lowered the frame onto it. Checked I had the bolts and spacers all in the right places ready to start.

Fitting the screw in spacers was a pain due to the amount of Powder Coating on the threads but after a rub down with the wet and dry & in one case running the Stanley knife round the thread all four spacers screwed in.

Again I Lowered the frame onto the motor and Ben slid all 6 bolts through once correctly aligned, remembering to add the alloy spacer to the rear upper mounting bolt.


It took Ben & I about 45 minutes to bolt the engine back into Trinity's frame.

Ben then made a video of me fitting the Triple Clamp Yokes which did not got to plan due to me fitting the grease seal upside down.


Ben back in Movie Maker mode. Shame I made a mess of the bearing seal fitment.


Once the yoke was fitted I bolted on the swing arm and used the hoist to mount the frame on the ABBA and head stock stands.


The engine alignment looks spot on.


It is now possible to work on Trinity any free time I have without worrying about access.


Once the forks were in it is obvious the decision to go Black was spot on. Well chuffed.


Very tidy indeed.


What a difference.


The workmanship in the clipons is outstading, very "Tick"


As everything was running so smoothly I decided to crack on for another hour once Ben had gone to bed & get the rear shock fitted.


To say that Ohlins is 10 years old it looks like new.


The polishing is just about right, not too much and not too little.
Can't wit to collect the Gold Anodized Torsion Bars from Martin.


"And that folks is that, for tonight"


All in all I am really pleased with our first 4 hour stint on Trinity's re-build. I will have another look at all the fixings late on tomorrow but for now the general quality of the job looks good.


Monday, 14 March 2011

Honey I'm Home! Trinity's back & we're ready to commence the Re-Build.

Well it’s now 1700 hours on Monday the 14th of March and at last the Blog is bang up to date. Playing catch up the last few days to bring Trinity from November to today has been fun but I’m glad we’re running in real time now.
Driving over to Atherton today in the van I was grinning like a “Big Kid” knowing I was getting Trinity back.  On the way I was still a little nervous about the forks but “hey it’s too late now their done!” I told myself.
Walking into the shop George has a great big smile on his face knowing full well why I’m there. After a quick “Hello Ray” he vanishes into the workshop reappearing with the swing arm, next it’s the frame, bearings all fitted & finally they appear. The Forks. “Oh my God, they look brilliant” I can’t believe the transformation.


Trinity arrives home in the back of the van, I'm taking no chances with metal on metal.


From this.....


To this, I am absolutely over the moon with the quality of the workmanship & the finish.


Nick took time out to polish the adjusters and get the caps anodized to match, Outstanding!


Side by side the difference stands out a mile.


Just no comparison. I love em, the forks that is not the guys.


A massive Thank You to the team at Kais.
Nick, George and Johnny. Outstanding work lads well done.


So Trinity is finally back home. Ben & I can get on with the re-build. 

So let the work Commence.


9+12 = 21 18+12 = 30 Now that’s what I call a Great 21st Birthday Present.

Strange how things just pop into your head when you’re doing stuff.  I was working through the paper work and receipts putting the history of Trinity into chronological order and it occurred to me that my son Ben would be 21 at exactly the same time as Trinity would be celebrating her 30th birthday.
Now that in my book is “Fate”!
So from that moment on Ben knew that Trinity would be his 21st Birthday Present from his Daft Old Dad.
Meanwhile back on the net and in the garage the work continued.
I ordered a full set of Swingarm, header and wheel bearings from Scott at Allbikes in Rochdale
Looking at the front yoke I started to think how I could clean it up as it was so pitted with being close to the sea front in Bournemouth for the last couple of years. When I came across a posting on the Redmonkey ZX-7R Forum where I get loads of tips and advice from. There was a set of Gold Anodized Triple Clamp Yoke on US ebay.


I bought them there and then along with a set of Clipons.
Dan shipped them the same day as I ordered them.


Ben had a ball videoing me unwrapping them on there arrival.

Dan later told me he was very nervous when he saw the box sat on the table unopened but loved Bens reaction when I took the yoke out of the box. The video is worth watching just to hear Ben.

Once the bearings arrived I fitted the wheel bearings easily, popping them in the freezer for a couple of hours and bringing the wheels into the kitchen to warm through. Then I fitted the wavy disc and took them down to Allbikes to get them shod with a set of Continental Road Attack 2’s


Ben is turning into quite the “Film Maker”


One happy young man.

Martin from the ZX-7R Forum offered to help me press the rest of the bearings into the frame but I felt nervous and declined his kind offer. Opting instead to take them down to Allbike who sadly could not press them in as they apparently did not have the correct size pressing equipment. So it was back off to Kais.
I took the forks with me and asked that when they were stripped down to post the fork leg ends over to Andy at Triple-S so they could be powder coated the same colour as the frame. I also asked that the station covers be anodized black, I’m just hoping this is not going to back fire when I pick them up later today.
With Trinity now either at Kais, Triple-S or Allbikes & the other two bike now sold, I set about the other parts.
First I sourced an engine with 5000 miles on the clock down in Wales so it was into the van and off to Wales to collect it along with the carburettors and the original clock.


It looks in great condition from the outside. I just hope it runs as well as I hope.

The brakes I had refurbished but when they came back from London I was not happy with the finish or the look of them.  So I got to work and found a set of GSXR 1000 Six Pot Tokico’s

I'm just not happy with the finish.


So it's an upgrade to these very nice Six Pot Tokico's.

With the breaks sorted, spacers bought, Carbon Finish Goodridge Hoses all sat in the garage it was time to set about fitting the Stubbie Pazzo’s. I've have had Stubbie Pazzo’s on my last 6 bikes so it was a no brainer.


The brake levers went from this....


To this......


To this.....


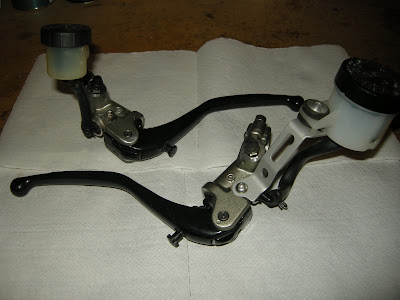
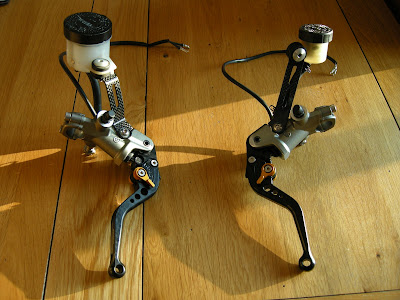
Finally to these fantastic set of Carbon splashed, micro switched, Stubbie Pazzo fitted Brembo's
From a Ducati 1098. I think they look amazing.


Andy took a couple of weeks to turn the fork leg ends round and what a transformation.

Paying cash on collection (via a trip to the cash machine as i had not got a penny on  me) I picked them up on the bike and fired them back over to Kais for the re-build of the fork. Sadly there was a delay as the anodizing had not taken first time and there were three bearings missing for the lower linkage in the swing arm.
The work carried on regardless, cleaning up the radiator and repainting it made it look a little better.

Looking its age and needing a little TLC


Which it got in the form of a full rub down and re-spray


Looking well with the Gold Anodized Grill from Doug at TrackdayTyres.