Saturday 16 April 2011

The work continues...................

Well after having another ride to make sure “The Beast” was OK, it was straight back into the garage to fit the freshly powder coated brackets that I had picked up earlier that day(Thursday).

Andy has done another blinding job at Triple S on the fuse box bracket, side stand bracket, front seat cross member and the rear foot pegs and hangers.


From this.........


To this in one easy move, powder coating.


I spotted a little rust on the bracket so it had to be sorted. 
Call me obsessive if you must but it's either right or it's off!


I may get the foot pegs done in gold at a later date, jury's out still.

They all went on very easily, the biggest job was finding somewhere to mount the Ohlins cylinder on the back end. I tried it outside the nearside peg, inside the nearside peg but finally it sat most comfortably inside the offside peg. So that is where it is at the moment, fixed with a couple of cable ties until I’m 100% happy with the location. Once I’ve been to Kais to get the suspension set up correctly for me, then I’ll use a couple of metal circular clips to fix it in place.


So there she is until I refit the rear hugger that is.

So with the Easter Break almost here it’s again time to wait for the body work which includes the spare tank! Once that is back the all important test can happen, starting Trinity Up for the first time with her new engine. How nervous am I about that? Especially as I’ve assured Lefty from the Manc Riders that I will make a video of the very first attempt. Why I’ve agreed to that I have no idea!

Friday was a brilliant day as I contacted Ian at Colour Anodizing and arranged to collect the “Gold” torsion bars that I had left with him on Wednesday afternoon. Now how is that for amazing service, not even 48 hours. When I got to Ratcliffe I was blown away with just how perfect a match Ian had been able to achieve. The bars are exactly the same colour as the fork yokes. Ian told me they had been done twice as the KTM Orange was just not right but the finished items look amazing.


New & old together.
Martin Archer your kit is sport on, thank you.

So back under Trinity and the bars were fitted in 15 minutes flat. The only problem I have created is the bolts are now about 5mm too short as the new bars are not recessed around the bolt holes like the originals but that’s no biggie. I will sort that out after Easter.


Just wish I had replaced that lower suspension bracket now! 


Now that look spot on in my book.
It's the little things that make the biggest impact don't you think?

Ian your an absolute gentleman, thank you very much indeed. Only problem you may have now is, I know where you are when I need more anodizing doing. I promise not to bug you though, honest!

Last job to do before the break is to collect Trinity’s seat from Tony Archers, that’s if he ever answers his phone. I know a busy man doesn’t have time to be on the phone all day. Hopefully I will get over there today with Ben on “The Beast”. If not it will have to wait.

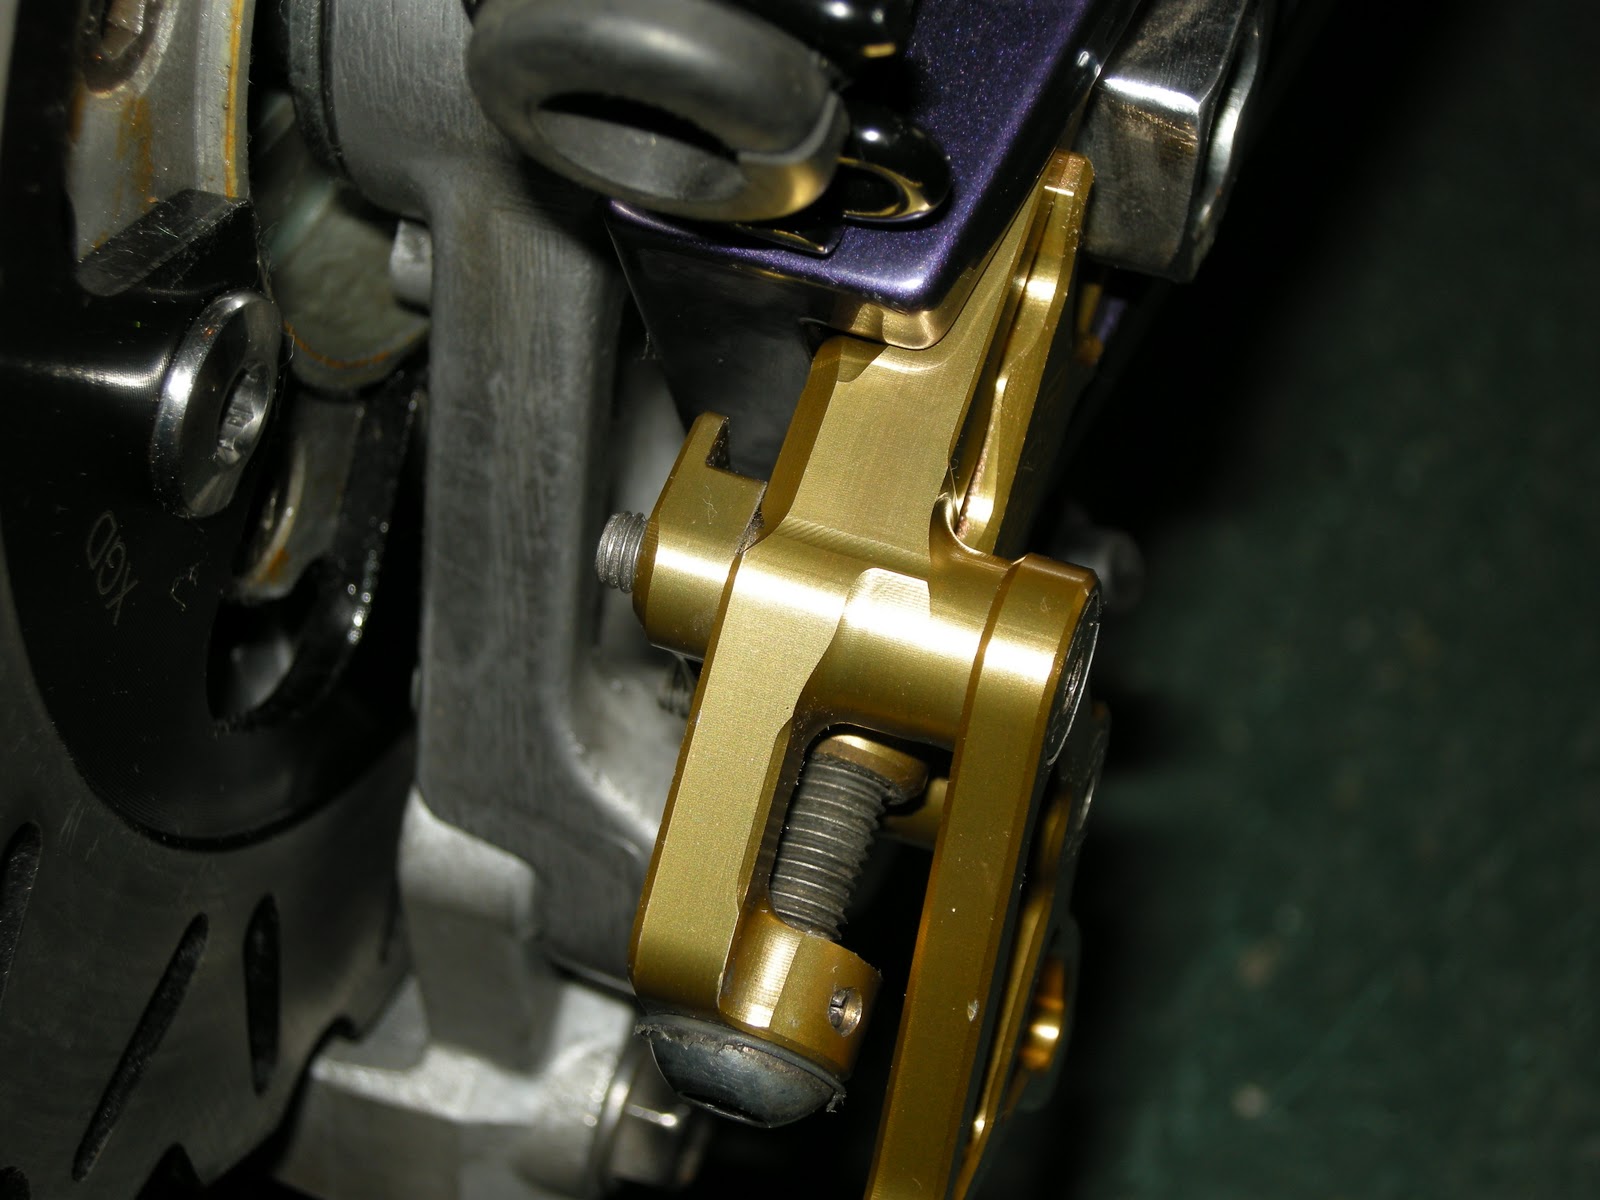
To finish on an even higher note, Mark from RCD dropped me an email last night to say the rearsets are now finished and ready for posting. I’ve arranged to collect them when I call down to pick up the body work from Dan at Dream Machine as the two offices are very close. That’s if I can stop myself from rushing down there and collecting them sooner which may well happen after Easter!

So here are the pictures Mark sent me. I think they look the business and are a perfect colour match yet again.


Whoooooow! 


I want collect & fit them............... NOW!
Fantastic workmanship Mark, thank you for taking the project on.

Have a great Easter everyone and I’ll update you all as soon as I have the bodywork, seat & rearsets back in the garage and ready for continuing with ........... “Trinity’s Resurrection”.

Thursday 14 April 2011

Well what a day................My turn to get walloped!

I’ve just been over to Triple S in Bingley to collect the last few bits of powder coating. I went through Todmorden, Howarth & the back way into Bingley no problem’s at all.

Coming back I thought I would nip back down the M606 & M62. Riding at 10 miles an hour down the outside of standing traffic in Bradford & there’s the nose of a Silver Vauxhall Corsa pocking out. He’s waiting to turn right but no one is letting him out into the oncoming traffic.

Smart white shirt, black tie 26/30 Asian gentleman, wife at the side with young 4 year old in child seat behind him. (All ages are guess work but gives you an idea of how long I’m stood there). He looks at me so I nod to indicate I’m going to pull round him. Pulling over as far as I can from his front end and close to the oncoming traffic that was just continues school run stream of cars.

When half way past I hear his engine go full tiltin my left ear,

“Shit, he’s going to pull out” BANG!

Back end steps out sideways as I’ve already wound the power on to get out the way so she flicks back straight. The car at the right hand side of me boots it the car following stops dead and there’s a gap behind it so that’s where I go.

Stopping with my right foot on the pavement facing the still oncoming traffic! Straight down with the side stand that cuts the engine, IO first look down at the exhaust covered in silver paint from cente stand to the end, looking up I see the culprit pull right into the middle of the road and “feck me” if he doesn’t wheel spin away down the centre of the traffic. Un- believable! Gone!

A lady with her little one looks at me all worried and I just popped my lid up and gave her a nod.

I had a good look at the bike and though if Ben had been on the back he would have had a broken leg.

Well lesson learned, don’t expect folks to understand what you’re thinking even though there is nowhere for them to go.

At least “The Beast” is OK & the powder coated parts look amazing again. Thanks Andy & yes I will call over once Trinity is all done and dusted so you can take a peek.

Made another YouTube Video last night


I met a really nice chap called Ian yesterday

Ian at Colour Anodising Ltd turned out to be a star today when he took on the job of anodising the torsion bars. After calling in at Anochrome Finishing in Heywood who informed me they could not anodize the bars the colour I was after but to try Colour Anodising in Ratcliffe. He told me they are very expensive charging £80 upwards per job as they are a massive company. How wrong could he have been?


I pulled over, did a search on Google on the old iPhone, got the number and gave them a call. I was put through to Ian who I explained what I was after, taking the very light gold coloured bars down to a deeper, richer gold colour. His reply cheered me up no end. “Yes we should be able to do that as we have a KTM Orange which we colour the Renthal sprockets with”. Woow.... KT, Renthal, how much is this going to cost me I thought to myself.

I headed straight to Ratcliffe from Heywood. Ian came down to the small reception area where I showed him the torsion bars that Martin Archer had made me and the bracket which Dan had sent me from the US to go with the Triple claps.

“I’m sure we can sort those out no problem at all. Can you leave the bracket with me?”
“Yes, not a problem at all!”
“I go on holiday Friday”
“So do I”
“We will have them done by then and we finish at 3 on a Friday so give me a call”
“That’s fantastic, thank you very much, how much will I they be”
“Don’t worry about it......................... see you Friday
“That’s brilliant thank you very much indeed”

Roll on Friday.........................

Wednesday 13 April 2011

It’s been a quite week but got a few things sorted.

Well I had an electrician mate of mine from the Manc Riders round to have a look at my indicator conundrum. I Could not believe it when he told me I’d fixed it and the previous owner had had the wiring plugged in the wrong way round! So all’s well that ends well.
I got the measurements I was after on Sunday from Roadburner from Redmonkey and they were bang on the same as mine, so the P1 –P6 has the same insert size as the L1 – L3.

I was so pleased when I saw this!
Cheers Roadburner.

So I dropped a quick order in for a set of Gilles Chain Adjusters to Sportsbikeshop.co.uk and whilst I was as at it I ordered a Double Bubble Screen. I received an email within hours to say they had no gold coloured adjusters & did I want black ones, but they could order them and it would be mid May before they were available.  A quick reply and the order my order was confirmed. Outstanding service from the off! I’m very happy and looking forward to the adjusters arriving.
I had a ride over to Rossendale Kawasaki to pick up the water tube & ended up buying an original ZXR750 L1 manual. Reading through I realised quite a bit of my wiring I had installed was in the wrong place so I spent today re- routing the wiring. It looks far better and I know it’s where it was when it came out of the factory.


That looks better, easy when you have the right manual.

Next job was to fit the water pipe and fill the coolant system which took 2.5 litres. The manual says it takes 2.8 litres so I will be topping it up once I’ve had the motor running.


I used a short section of Samco rather than the old black rubber sleeve.

Lastly I spent half an hour trying to paint the rear calliper with so called “Calliper Paint”. What a load of rubbish that was.  It took another half hour to clean it all off with thinners. It was like trying to paint with extra thick porridge and look atrocious! So the calliper is now all cleaned and ready for spraying as the thinners also cleaned off the silver spray used by the guy who refurbished them for me in the first place.


All set for spraying now.

I have managed to sell the Gilles chain adjusters to the guy I was bidding against thanks to the previous owner, so those will be coming off today.
So as it stands at the moment. Trinity’s bodywork and tanks are at Dream Machine and should be ready for collection at the end of the week. The rearsets are with Mark at RCD and I am awaiting an update email any time now. The fairing infills are all in the USA being fabricated in Carbon Fibre by Adam who stepped up when I posted on Redmonkey “Does anyone know a decent Carbon Fibre Fabricator willing to take on a one off job?” The P1 Gilles chain adjusters and double bubble screen will be here mid to end of May from SportsBikeShop.co.uk. I also have a few parts over at  Triple-S with Andy being coated black. So all things being equal, Trinity should be ready for a test start-up when I get the spare tank back and fitted.
I am going to have her checked over before I put any of the bodywork back on, get the engine serviced and carburettors balanced by a professional. I just cannot decide whether to take it to Rossendale Kawasaki or All Bikes in Rochdale. It would be nice to get another official Kawasaki Stamp in the owner’s manual but I know the mechanic at All Bikes will look after her like gold. Tough call!
As promised here are a couple of picture of the Rizoma in the day light.


Left.........


Right.........


Centre...........
Just right, not too much or too little.


Friday 8 April 2011

Mmmmm Nice! Very nice indeed........ Rizoma

Well the Rizoma handle bar grips and bar ends arrived yesterday from More Speed Racing, saving me a call to see where they were.
I was going to leave them off until after Trinity had been inspected by the mechanic at All Bikes but you know how it is................. NA! They just looked so good sat there in the posh foam lined box so I just had to get them fitted at 8.00 O’clock last night.
My first job then was to measure the length of the grips and mark where the holes had to go in the handlebars for the lugs to fit in. I chose to start on the clutch side for ease. Starting with a 1.5mm drill I marked the bars to get a good pilot hole, moved up to a 4.5mm and finally bored it out to 5.5mm. Re fitted the choke and wiring took no time at all as I’ve done it so often now. The left grip is held on by two small allan key lugs which takes just a minute to do. The end cap of the bar ends screw off to reveal the allan bolt which I found to be 5mm too short as I could just not get the rubber bung to grip and compress once I had fitted the washer inside the bar end. I used an allan key and rubber hammer and placing the two arrow shaped spacers onto the bolt, the second one being threaded I tightened the bolt as far as I could without it compressing. I warmed the rubber spacer up under the hot tap which really helped. I then pressed the rubber spacer into the bar end with another round ended allan key, finally tapping the allan key sat in the bolt with the mallet, slowly sliding the whole thing into the bar. Finally, tightening the bolt until the bar end stayed in place and did not spin round.
The other side took less time but was a bit of a pain as after drilling the hole I struggled keeping the throttle cables in place. Luckily for me I have my trusty mechanics mate called Ben. Who is always up for helping his old man especially when it keeps him out of bed for another half hour.
So with Ben holding the cables in place I re-fitted the back casing and we were in business or so I thought. I had forgotten to turn the grip to line up with the other side, so had to split the whole thing again, slide the grip out of the cable grip turn it and re-do all the above again! Our timing was perfect as Ben’s “stay out of bed pass” had just run out.
Anyway the rest went together really well. I used two very large washers as spacers when bolting the bar end on so as not to foul the twist grip and well folks that was that.


I will take some more pictures in the daylight but you get the idea.
Beutifull!

Wednesday 6 April 2011

Well they are working Jim "but not as we know it!"

Called Dream Machine, Daz was busy on the phone so left my number.

Had a mixed day today. Started off with a trip to  All Bikes in Rochdale for a relay which Scot did not have & so it was off to good old Halfords to pick up a cheap indicator relay, £4.35 and ended up buying a new battery, coolant, metal file and electrical connector cleaner. I then popped down to my old place of work Robinson's of Rochdale to pick up an Optimate connector and speak to Doz the mechanic. After a quick chat he agreed to lend me his Chain Riveter as long as I brought it straight back as he had a new chain to put on next.

First thing I did was try the rely. Nothing! Then as Doz needed the riveter back I sorted the chain which was a breeze. Back in the car and off back down to return the kit. Dorian your a star mate. Enjoy that pint on me.

Back in the garage it was off with the front end, lights, clocks & switch gear.


Oh the joys of finding a wiring problem!

I cleaned every connector, wire terminal & anything else that look remotely dirty. Disconnected, cleaned and reconnected all four indicators. The front right which was the rusty one got swapped for another I had lying about. Put it all back together. Switched her on........................................ Nothing!

I then had a mad idea, what if I turn the relay round so the pins go in at 9 Oclock & 12 O'clock as apposed to the 6 O'clock & 9 O'clock that they were in. Yeee Haaa it worked all be it, front left and back right but they worked. So I swapped the rear indicator connectors round and bingo we have indicators & both sides flash at the same speed.  I'm not 100% sure if this will cause any long term damage but they work so that will do till I find out differently. I popped the Optimate connector on and put the new battery away until I get Trinity running.

Lunch break and a quick update on both Remonkey ZX-7R & Manc Riders forums to ask if swapping the relay round is going to do any long term harm.

Daz called me back, "bad news is I'm sorry but we need your spare tank for the ZXR decal design, good news is we should be all finished by Friday next week". Top Banana! I'm bouncing at this point.

Postman turns up and there is a very small package for me from Doug at Trackdaytyres, it's the off cuts I had asked him if he had. Two perfect size Gold anodized squares of mesh.


Nothing better than a Freebie!
Doug you are an absolute star, thank you very much!

So it was out with the wire cutters and away I went. Love doing a bit of something else when I'm getting bogged down.


If only you could see how GOLD it looks!
Brilliant!

A quick run round with the polish and a duster & that it for today. Sun is out and so am I on "The Beast" to drop off Trinity's seat at Tony Archers for re-covering.


RBLR Cheque Presentation on Saturday


Tuesday 5 April 2011

And it was all going so well....................

Well thought I would keep today's post nice and simple and just do a walk around Trinity pointing out the stuff I've done so far.

So here is that very video.


Things were going really well then the indicators died!


I have no idea why they stopped working, I've looked at the connectors, the switch, the fuses. If I have to guess I think it will be the flasher relay that as called it a day but right now I'm a bit hacked off.

I did manage to get the water coolant pipe ordered yesterday form Rossendale Kawasaki so that should be here by the end of the week if not early next week. I have also had an interesting exchange of emails with Gilles reference buying a set of chain adjusters but they no longer make the KTS adjusters and never made a set to fit the L1 in the first place. Try as I might I could not get the dimensions of the ZXR P1-P6 adjusters so I still do not know if they are the same size. I know the ZX6 is the same size recess but has a curved swing arm end so would have the wrong clamp fitment, I think!

I also intend contacting Darren at Dream Machine for an update on the re-spary this week and see if I can get my spare tank back so I can get Trinity's motor running.

To finish on a more positive note. Mark at RCD dropped me an update email with a picture of the rearsets pre-anodizing.


Just imagine  these in Gold with Carbon Fibre kick plates.
At least these have cheered me up a bit.

I'm off now in search of a flasher relay unit & some Gilles chain adjusters that will fit.


Monday 4 April 2011

Sometimes the Stuff just doesn't fit!

Well as far as first projects go I’ve been very lucky with only a two parts not fitting.The first was a set of four pot Tokico callipers from a P1. I bought these in February after taking advice on the ZX-7R Forum. Problem was the guy who advised me thought I had a P1. The mounting hole spacing’s are 90mm on the P1 whereas Trinity’s are 62mm.

I was really pleased with these but the bolt holes are 32mm too wide.
For sale at £80 the pair plus postage, email me at Jap_STi_3@Live.co.uk

The only other thing I have bought which do not fit is a set of R1 Gilles chain adjusters. I took a gamble when I got the measurements back from the guy selling them on ebay. They arrived on Friday and I fitted them straight away only to realise there too long.

They look amazing and the Titanium Nut just sets them off perfect.
Shame I havent' got a chain rivit press, yet another job to do!


Spot the difference. Yuck!

They look amazing but they are just 10mm too long and the axel bolt hole is way too large. Lucky again though, the gold anodized lock nut does fit so I’m happy with that as they alone cost in the region of £55.

So close and yet so far 10mm too long.
I could use them but that 10mm would bug me to death.


Just found this on Youtube and I will not be taking Trinity out till I have the right adjusters!

Trinity needs a set of adjusters 85mm long from front face to lock nuts, 45mm wide and with a hole 25mm diameter for the axel bolt. So I will be emailing Gilles to see if they make a set with these dimensions for any other bike.
Stupidly I had left one of the lower water hoses attached to Trinity’s original engine so chose to replace all them all with Samco Hoses in gloss black. As ever Samco produce full kits for everything except the L1-L3 models. Again after seeking advice on ZX-7R Forum I found out that the P1 – P6 hose set fits all be it for one of the hoses. I took the plunge and bought a set from RiceRocketUK on ebay. These arrived on Saturday morning and so I fitted them this morning. There is one hose missing as opposed to not fitting and it is the very lowest offside hose that is covered in the wire looping.


Before...........


& after


& after take two.........


Still when fitted the hoses look very tidy. All I need to do now is buy a replacement connector pipe as the one I have is just covered in rust on the outside. Obviously the hoses had not been fitted correctly somewhere down the line. So the search starts for a 195mm long 25mm diameter tube. I’d love it to be Carbon Fibre but can only find one connector on the Samco web site.


Not what I expected to find but I'll get it sorted.

So a little bit more searching to be done now for the connector pipe and that will be the coolant system up and running.

Friday 1 April 2011

All I can say is “What a difference a lunch break makes!”

Yesterday I cleaned the air-box by putting it through the dish washer to clear out all the sand along with the carburettor attachment rubbers. I greased up the new K&N Air filters edge, greased the freshly cleaned wire mesh insert and rebuilt the air-box. Last job was to put the K&N sticker on the air-box.
Having stayed up till 1 in the morning to bid on a set of Gilles Gold Anodized Chain Adjusters which I won I was in a really good if not slightly tired state when I started on Trinity. I just hope they will fit when they get here. They were being sold as 7 year old R1 adjusters that have never been used and come with a gold anodized spindle nut. Fingers crossed they will fit. I had the seller measured all the dimensions which were all correct but sadly he never measured the whole for the spindle. So it’s a nervous couple of days now untill they arrive.
I thought I would start with an easy job this morning, fitting the coolant overflow bottle. Simple, two bolts & two pipes, how hard can it be? Good question! After polishing 6 bolts as the first 4 were too long I then proceeded to run the filler pipe down to the carburettor coolant pipe filter? To make matters worse I cut 25cm off the pipe so it was the right length, why? I have no idea!


I now need to buy a length of hose to replace the lower one.

Next I thought I would fit the air-box, only to find three pipes unattached and no petrol supply to the carburettors. Trying to push the air-box onto the carburettors was getting me no where so I sacked it and but the box back on the shelf.
Try as I might there was only one job I had to do, fit the braided hoses but first I had to see where the petrol supply to the carburettors ran. For some odd reason I had attached the main petrol supply from the pump back to the petrol switch??? What is going on in my head at times I have no idea.
After a good fifteen minutes of faffing about I was still none the wiser as to where the damn pipe was supposed to go so it was back to my mate “Haynes” for yet another scour of the pictures and exploded diagrams that mean ”bo diddly squat” to me most of the time. It was just about now that I had a horrible gut feeling that I just do not have the knowledge to be able to rebuild trinity.


I just had a mental blank at this point & could not remember where the pipes went.

I decided to tighten up the rear brake calliper bolts and re attach the calliper to the bracket to see what it looks like. Nope it’s got to be a gold colour or black but gold will be best.  That’s yet another job to do.
Just then Jeannie came in to say lunch was on the table so I took a couple of pictures of the offending pipes and went in for a bit to eat.
Half an hour later, lunch done and dusted I had a look at a really blurred close up picture I had taken back in November and there is was the Grey lined pipe straight down the centre of the carburettors. There was also a black pipe running down the right hand side which made me realise the pipe I had attached to the filter was in totally the wrong palce.

Straight back into the garage I realised the grey lined pipe should be down the centre as per the picture and plugged into the centre breather pipe. Done! The two carburettor end pipes fitted to the corresponding water pipes on the sides of the engine. Done! That’s it I thought everything is in place so I put the air-box on and leaned on it with my full body weight and it just slid on. Fastened the front fastening nut and plugged in the four pipes. Job Done! What had this morning taken me to an all time low had now set me up for a great afternoons work.

It took me almost 45 minutes to sus out how to get the petrol to the  carburettor.

Opening the Goodridge box of hoses put me back in my place. The clutch hose was fine as it was in its own bag. The other three were all together. Half an hour later and the front brakes and clutch hoses were all attached. I must admit it took three attempts to get the brake hoses in the right place. They look great!


Once the front mudguard is on and the hoses clipped in place,
they will look just amazing.

A couple more pictures of the work done so far and I was away.


I like Trinity from this angle.


Air-box fitted and looking smart.

So much so that I thought I would risk it and start filling the clutch hose. After an hour and a half the clutch was sorted. Next I fitted the Ram-air box after polishing 4 more bolts as the first two were just too short.


Things are coming together really well now.
I just need those chain adjusters, ASAP!

The biggest mistake of the day was to start and fill the front brake system with only an hour to heading out for a meeting at 1900 hours.
Things were just not happening.  Try as I might the dammed brakes just spat fluid out all over the garage floor from the opposite side. I thought I had tightened the other side up but no and there was a great puddle of brake fluid to prove it.
Annoyed with myself for falling into the “just another job” trap, I covered Trinity up with half a job done. Cooked some rice for the little ones tea’s and went to fetch Ben from the park.  
Of to our meeting and back watching a rerun of Benidorme on TV I went into the garage to fetch a beer. “I wonder?” I thought to myself, so at 2130 I set about bleeding the brakes again. After massing about for almost 45 minutes I decided to clean and put the old bleed nipples back in the callipers. Within another hour the brakes were done and dusted. Bleeding the master cylinders last was a so easy and my word do they feel sharp. So after a quick tidy up it was 2300 hours. Finished another job though and really pleased with what I have achieved today.
Last job of the night was to stick Trinity’s battery on charge. I’ve already hooked it up and all the dash lights come up and the flash worked on the main beam but no indicators or lights just at the minute. That’s a job for another day. I could just do with the tank back now to see if I can get her running.

Last shot of the day.......... well I thought it was!